OVERVIEW
Folder Options tab refers to where files will be stored. OfficeTools WorkSpace does not actually store your documents within the confines of our interface thus files will be stored in a location, ideally, on your server.
USER GUIDE
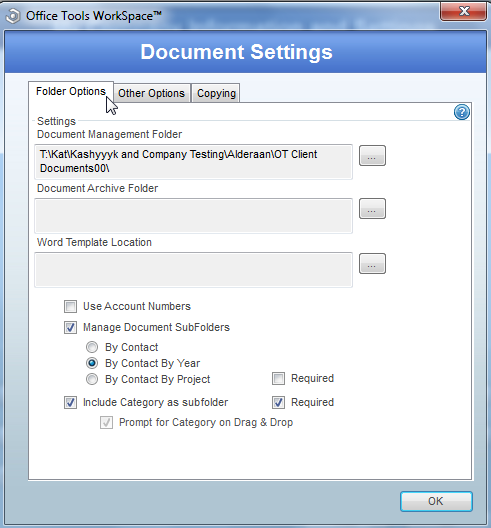
Document Management Folder – This is where all of your files for your clients will be stored. OfficeTools WorkSpace will manage this location and create the folders it needs according to the way you label documents in the interface. This should be mapped to a location that all users have access to as all files for all contacts will be physically stored here.
Document Archive Folder – Documents will be moved here when they are set to be archived. Due to the nature of how the documents are displayed in WorkSpace, it is beneficial to set documents to be archived and/or deleted in appropriate intervals when they became irrelevant. It will help with ease of finding current documents in WorkSpace.
Word Template Location – This is a simple link to Word Document Templates if those pertain to your office. If there are certain Word templates that are frequently used, by mapping OfficeTools WorkSpace to the location of those templates, you can create a brand new document using one of those templates from the interface. From the Documents tab, click on the plus sign in the toolbar and create a new document. In that window in the bottom right corner you will be able to select the desired template.
Use Account Numbers – This checkbox controls the folder structure that is created in the location specified in the Document Management Folder field at the top of that window. Because OfficeTools WorkSpace creates the folders that it needs as you create documents, some specifications need to be made to the preference of that structure. By default, the folder structure will begin with the Contact’s File As name in OfficeTools WorkSpace. There is no option that needs to be checked for this to happen. However, if the Use Account Numbers box is checked, the folder structure will begin with the Contact’s account number located in the upper right hand corner of the Contacts tab. If this option is selected but a contact has no account number, the system will revert back to the File As name.
Manage Document SubFolders – After the Contact level folder mentioned above, there will be subfolders that help organize documents. In the OfficeTools WorkSpace interface they will be referred to as Year, Project, and Category. In the context of the folder structure however these will be the folders that are created under the contact name folder. We recommend under almost every circumstance to have the box checked that reads “Manage Document SubFolders” so that a folder structure is created. The three bubbles that follow control to what length and in what order the subfolders are created. Most offices will choose the bubble that reads “By Contact By Year” that will order your subfolders like this: Contact Name folder > Year folder > Project Folder (e.g. ABC Company > 2015 > Corporate Tax Return). Some offices will elect to reorder that sequence to read ABC Company > Corporate Tax Return > 2015 by selecting the By Contact By Project option. That puts the project name ahead of the year it belongs to. The option that reads “By Contact” is rarely used but removes the Project and Year as subfolders in the Folder Structure. The “Required” checkboxes make it so that you can’t have a document in OfficeTools WorkSpace without the corresponding option filled in on the Document form.
Include Category as subfolder – This makes the categories that are associated to a document part of the physical path to that document on your server. Which means if you had a category called Tax Returns for example, the order of your folders would be as follows given best practices: ABC Company > 2015 > Corporate Tax Return > Tax Return. The benefit gained is the extra label on the end. This allows you to quickly find different types of documents like tax returns, P.O.A.’s, and source documents. Best Practices is to require categories due to the extremely flexible and customizable nature of them. You define your categories by navigating to Setup > Documents > Categories.
Prompt for Category on Drag & Drop – If you are using the Drag & Drop box located in tasks like To-Do’s, Calls, or Projects, a prompt will ask for the category that document falls into. The best practice is to enable this option so that a label is given to that document for searching purposes.
